
Pattern Description:
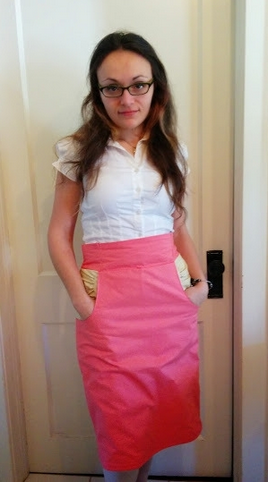
Kasia Skirt
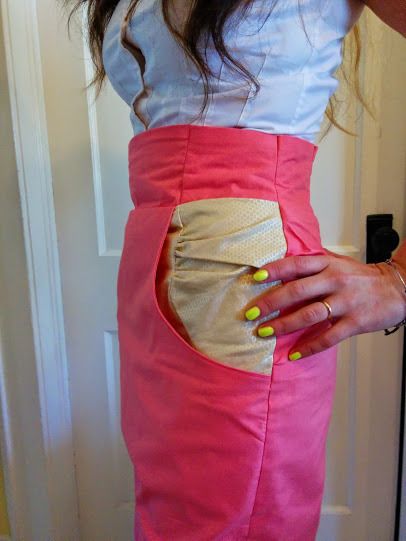
Great for summer fun, this skirt features gathering of the pocket backing and bold bib-front buttons. Try using a contrast for the pocket backing for some extra punch.
Fabric Used:
Two different 100% cotton fabrics.
Notions:
zipper, interfacing
Size Sewn:
38, but the waist was far too large. The rest of the skirt fit well. I just took the waist in by about 3".
Modification Advice/Errors in Pattern:
Checked out reviews on Sewing Reviews and a number on Burda Style itself. Posted the most pertinent info below.
- Peacock Chic says: stay stitch front curve to help in fiddly gathers, front pockets tend to pop away from body, add snaps, Make sure to use a thinner lining fabric for the pocket pouch. Thicker fabric will cause the pocket seam to press on the front and it may show.
- punk_rose says: I would suggest making a size larger than the measurements indicate on the pattern, but not two. This made it a little too loose, and I had MORE fitting problems as a result. Also, choose a fabric with some structure, like cotton, but you don't want to use anything thicker than a canvas-weight, since in some places the layer are quite thick.
- nicegirl says: My one complaint with the pattern is that the front bib lining goes only about halfway down the skirt. When I was planning this skirt I intended to make the inner front panel go the full length but then forgot while cutting and didn't have enough fabric to recut it. If you know it's there, you can see the ridge of the bottom of the inner panel at thigh level and it just looks a little tacky.
- SewSara says: I should note that in step 9, they reference piece 9 along with 6&7, but piece 9 is the back hip yoke, not part of the waistband. I should also add that in step 4 & #8 when attaching the hip yoke to the skirt panel, it says to pin. I basted the yokes to the skirt before sewing and it helped immensely.
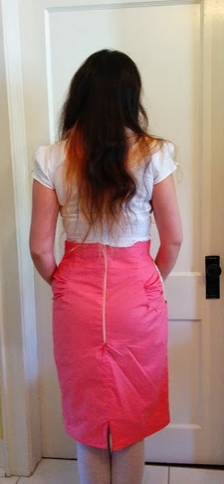
- evildaemonlady says: modification of zipper on back and no buttons! Her blog here. First and foremost, the skirt has a back zipper. I split the rear waist piece and added 1.5 cm to each side at the center, so as to allow for a seam there. In the original pattern, the skirt's kangaroo pocket pouch hides a center front zipper and closes with buttons. In my version, I omitted the second front waist piece that used to top the kangaroo pouch and did not sew seams designed to keep the pockets separate from the zipper. Instead of leaving the flap free, I first basted it and then machine sewed it into the actual waistband when I applied it to the skirt. The waistband was applied last and in finishing, I hand sewed the waist facing to the top inside of the skirt.
- andread says: There are a couple of minor errors in the instructions. In Step 8: When you go to assemble the waistband, the instructions will tell you to "position the interfaced center and side yokes 9 pieces 6 and 7)." I deciphered that the "9" there is actually supposed to be the open parenthesis, and it does not refer to piece #9. Secondly, in Step 9: After you sew the interfaced front yoke piece onto the skirt front panel, you will be instructed to "fold inside and press the seam allowance of the bottom edge along the interfaced front yoke," then sew it onto the yoke you already sewed, right sides facing. In order for that to make sense, the instructions to fold under and press the bottom edge MUST refer to the UNinterfaced yoke section (i.e., the one you haven't yet sewn onto the garment). Hope these clarifications are helpful!
Alterations Done:
Moved zipper to the back (which mean piece 7 is unnecessary and button holes didn't have to be done).
Had to take in the waist about 3".
Would I Sew Again?:
Maybe. I really like the look of it, and feel like I've learned a lot about it in the process of making.
My Favourite Things About it:
Pockets! And I think it looks flattering. To be honest, I was ready for it to look garbage on me (due to my lack of skills and my own materials, not the pattern itself).
My Least Favourite Things About it:
SO fiddly! I'm sure a more experienced sewist would have no problem, but I'm not yet able to envision the right way to
1 comment:
Looks great. I think that style really suits you. And your fabric choices are a zillion times better than the terrifying stuff they've got going on on that pattern page.
Post a Comment