
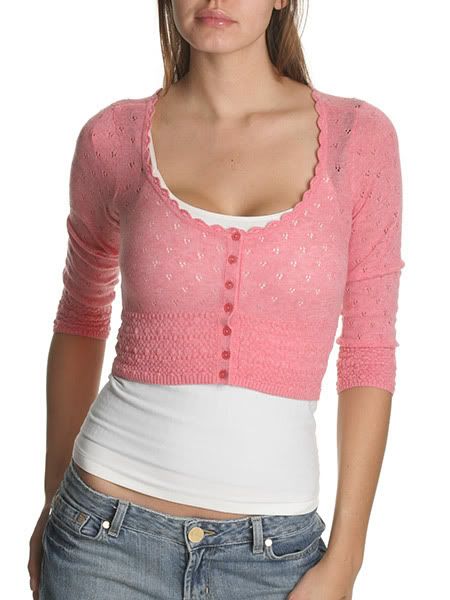
Introducing my Anne Elliot

Specs:
Yarn: Wendy Yarn - Peter Pan 2 ply
Needles: 2.25 mm
Pattern: My own, after the Guess Spencer (sketchy notes to be added if by popular demand)
Things I'd change:
More careful with buttonholes - they don't all match up.
Sleeves should be smaller - they're a bit baggy as is. When I inevitably make a second Spencer, this will be more carefully calculated (instead of just "well, it took 90 stitches across the back...)
Also along button edge - I've been knitting for years now and so have no excuse for this mistake, but instead of making the under-button edge garter, I made it stockinette, which of course leads to the wonderful curling-under that is quite visible in the photo.

The yarn itself is very stretchy, and blocked out quite nicely (except for the rust-stains caused by evil pins).
What colour should I make next? I'm digging the golds and greys as of late.

Specs:
Yarn: Wendy Yarn - Peter Pan 2 ply
Needles: 2.25 mm
Pattern: My own, after the Guess Spencer (sketchy notes to be added if by popular demand)
Things I'd change:
More careful with buttonholes - they don't all match up.
Sleeves should be smaller - they're a bit baggy as is. When I inevitably make a second Spencer, this will be more carefully calculated (instead of just "well, it took 90 stitches across the back...)
Also along button edge - I've been knitting for years now and so have no excuse for this mistake, but instead of making the under-button edge garter, I made it stockinette, which of course leads to the wonderful curling-under that is quite visible in the photo.
The yarn itself is very stretchy, and blocked out quite nicely (except for the rust-stains caused by evil pins).
What colour should I make next? I'm digging the golds and greys as of late.
Pattern
Please let me know if you see any glaring errors. I didn't keep the best notes going along. I hope this isn't too convoluted.
Sized for a 36" bust. You can read my suggestions for pattern-improvement.
Gauge: 7 sts/inch
Yarn: Wendy – Peter Pan 4 ply
Needles: 2.5 mm
Extras: seven 1 cm buttons, tapestry needle.
Warning: crochet ahead!
Hook: 3 mm
You can block the Spencer to make the lace look nicer. Just don't use pins that will rust! (yes, I did).
Double Seed Stitch:
Row 1 - *K2, p2. Repeat from * to end of row.
Row 2 – As row 1.
Row 3 - *P2, k2. Repeat from * to end of row.
Row 4 – As row 3.
Clover Lace:
Rows 1 and 7 – K
Row 2 and all Wrong side rows – P
Row 3 – K2, yo, sk1, k2tog, psso, yo, *k5, yo, sl1, k2tog, psso, yo*, rep from * to *.
Row 5 – K3, yo, ssk, *k6, yo, ssk*, rep from * to *.
Row 9 – K1, *k5, yo, sl1, k2tog, psso, yo*, rep from * to *.
Row 11 – K7, *yo, ssk, k6*, rep from * to *.
Back
CO 82 sts
work 1x1 ribbing for 1 cm (0.5 inch)
work double seed stitch for 6 cm (2.5 inches)
Begin clover pattern, and begin increases. Increase 1 st on each side on the Front Side of the work until piece measures 23 cm (9 inches) long.
(I had to fudge the pattern for the increases. What I did was placed markers at the beginning stitches, and continued the pattern as normal within the markers. When there was enough stitches outside the markers - which is seven, I believe - I worked those in pattern).
Shaping armholes:
When piece measures 21 cm (8 inches) long, begin shaping armhole by dec 2 sts on each side of Front of work for six rows. Then dec 1 st each side until piece measures 28 cm (11 inches). Arm holes are now shaped.
Continue in clover pattern until piece is 36 cm (14 inches) long.
Front Panels:
Work two. Just remember to reverse the neckline and arm hole shaping!
At this point, choose which side you want the buttons on, and which side the button holes.
CO 38 sts (this is what I did, but I recommend casting on a few more. I found the front panels to be a bit small).
Do the same shaping for the front panels as you did for the back, save for the 6 sts along what will be the buttonhole edge. Here I just kept the knitting in sockinette.
Button holes:
You create the first buttonhole on the first row of double seed stitch, and from then on place the buttonholes at approximately 2.5 cm (1 inch) intervals.
All I did was work 2 sts on buttonhole edge, cast off 2, and continue in pattern. Then on the next row, you just CO 2 sts over the space created by the 2 you cast off.
WHEN THE FRONT PANELS MEASURE 8 INCHES
Begin neckline shaping. (this is also when you begin armhole shaping!)
Neckline Shaping:
Cast off 18 sts to create beginning of neckline. You should have about 30 sts left.
Now you continue to shape the neckline edge by dec 1 st along neck edge every Front side row. Continue dec in this manner until you have 12 sts left. Work until front panels are same length as Back.
Sleeves:
Make two.
CO 70 sts.
Work 1x1 ribbing for 1 cm (0.5 inches).
Begin clover pattern.
Work in pattern until piece measures 4 cm (1.5 inches).
Begin shaping sleeve.
Dec. 1 st each side of Front of work until you have 2 sts left (my sleeves ended up being 16 cm/6.5 inches long).
Finishing:
Sew up side seams, shoulders and sleeves. Place and sew buttons.
Pick up sts along neckline (sorry, I didn’t count them), and knit two rows in stockinette. This makes a nice edge for you to create the crochet trim upon.
Neckline crochet:
Starting at one edge of neckline, make 1 sc.
Skip 2 sts.
Make five dc in next st.
Skip 2 sts.
Slip-stitch this down.
There you have the mini-shell that I used all the way around the neckline. Just continue the pattern til you get all the way around the neckline. I consciously kept my crocheting a little looser, because I was afraid it would pucker the knitting and look funny.
Suggestions for improvements to pattern:
If I were making this pattern again, I would add an inch-worth of extra stitches to the bust area (I would spread this out across the front panels, so I'd add 0.5 inches to one side and 0.5 stitches to the other).
I would also attempt to do it in the round, at least for the bottom half. I only suggest this because I dislike sewing seams.
I suggest creating a row of garter stitch on the edge of the front panel where the buttons will be sewn. This will make the fabric want to lay flat, rather than curl under like the original does.
Here is a pathetic Paint diagram of the measurement I took of the Spencer. If you can measure your own gauge, you can fit the pattern to you and your own yarn/needles/tension.

27 comments:
That is so pretty!
Have you seen the Persuasion movie with Amanda Root and Ciaran Hinds? It is wonderful.
Thanks :)
I haven't yet! I'm looking forward to it.
that looks great!
This top is soo cute. I especially like the neckline. I would love to see some notes on your pattern.
By the way, thanks for visiting my blog ;)
I love this! I would definitely like to see some notes on the pattern, if you don't mind. Also, what do you mean about the under-the-button edge being stockinette--are you talking about the row beneath the actual buttonhole? (I've never done buttonholes.)
that is nice. I really like how it fits. It really highlights your... um... boobs.
There I said it. And I'll say it again.
Nice rack.
cari, the "under the button edge" is my poor way of saying the part of the top you sew the buttons on to. The part that gets overlapped when you button up the top. Hmm, still doesn't come out very clearly! If only I could draw a diagram...
I'd be happy to share my notes! I'll post it within the next day.
Oh steph, you make me laugh!.
Hi! I've recently stumbled upon your blog. I love the top you've designed - very feminine and spring-like. (Scrolling down to older posts, I also love your version of the u-neck fair isle sweater from Vogue. I saw that pattern in the magazine and fell in love, but I've never attempted fair isle before.)
It's wonderful!!!! Congrats.
WOW what great posts the last few are full of pictures! Looks like a great FO
Thanks so much all! Pattern notes to come tonight :)
That looks really nice :) It must have taken a lot of patience to knit with such small needles. I really like how this capelet is body-conscious without being blatantly so.
Yes, the needles were very, very tiny! I like knitting with a small gauge. I find I like the look of the pieces better.
I was just thinking, why didn't you name the pattern the Stephanie? Not Brittish enough for you?
Absolutely love it! Thanks for the great pattern!
Love it! The fine gauge makes it such a delicate top, and really suits the stitch patterns you used. Great job!
may
mayflwr.typepad.com
I love this! Thank you for the pattern. I'm a great fan of both Jane Austen and Regency era styles. Could you tell me how much yarn you used? I need to enlarge the pattern and I'd like to know where to start. Thank you!
Hi - I'm glad you like it! I used approximately two balls of the yarn specified in the pattern. It really doesn't take much at all, seeing as how it has short sleeves and only half a bodice!
Happy Knitting :)
I love this! It's very cute and I would love to make one for myself. If I wanted to make a smaller version, say for a 32'' instead of a 36'', how would I do that? I would really appreciate your help and advice.
I hope you re-check this comment, steve_o2005, because I have no other way of contacting you! It's gonna be a long answer - please leave your email addy/blog address/craftster info?
Sorry, I haven't actually set up a blog yet. My email is steve_o2005@yahoo.com. If you can send the answer there I would really appreciate. Thank you!
Oh yay!
One of my coworkers and I were just saying it was impossible to find a cute little sweater like this...
I'll have to knit one up!
Thank you for your lovely pattern! :) I finished my Anne Elliot yesterday. If you want to see it, there are pictures in my blog http://villaista.blogspot.com/2008/08/kes-vai-syksy.html . I'm sorry, but the text is only in finnish.
do you have maybe a step by step pattern written for absolute newbies, to whom all of the mysteries of knitting are not yet deliniated by quick instructions? I love this shrug. MaevePotter@gmail.com
hi! thank you for posting this, I'm half way through the back now!
I've just got a question, in the back pattern, where you decrease by 2 stitches on the front for 6 rows, is that six rows in total or six rows of just the front work? thank you ^.^
chandler_holic (@) yahoo.co.uk
This looks amazing - just the kind of pattern I've been looking for. I'm a beginner at knitting, but quite tired of scarves, lol. Thanks for sharing and if you make the improvements, please load it up here.
Fantastic!
Bravo!
Post a Comment