Le Lapin Noir
by
CanarySanctuary
http://canaryknits.blogspot.com
Spurred on by my inability to find a good argyle sweater, Le Lapin Noir was created with retro sweater-girl inspiration.
To make it a suitable warmer-weather knit, a light sock yarn could be substituted.
Needles:
2.5 mm straights
2.25 mm circs (at least 18” long)
Yarn:
Cottage Craft Angora 100% angora yarn
Approx. 90 metres/hank (discontinued)
http://www.cottagecraftangora.com/
Black 8 (9, 10, 12, 14, 16, 18) hanks
Pink 1 (2, 2, 3, 3, 4, 4) hanks
White 1 (1, 1, 1, 2, 2, 2) hanks
Gauge:
8 sts/ inch
10 rows/ inch
Sizes:
XS: 28”-30”
S: 32”-34”
M:36”-38”
L: 40”-42”
XL: 44”-46”
XXL: 48”-50”
XXXL: 52”-54”
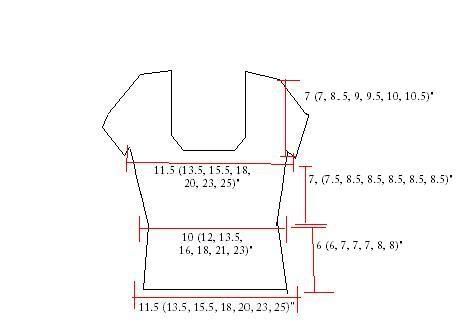
Front
Using long-tail method and 2.5mm needles, cast on 92 (108, 124, 144, 160, 184, 200) sts.
Knit in 1x1 ribbing for 4 (4, 5, 5, 5, 6, 6) inches.
Decrease row: You will be decreasing 2 sts each side every time you do a decrease row.
K1, P2tog, K2tog, knit in rib across sts until 5 before the end of the row. Then Kl, P2tog, K2tog, P1.
*Continuing in rib, knit another 1 (1, 0.5, 0.5, 0.5, 0.75, 0.5) inches.
Work another decrease row as stated above.
Repeat from * 1 (1, 1, 3, 3, 4, 2) more times.
At this point you should have 80 (96, 112, 124, 140, 164, 184) sts.
Knit in rib until you have 6 (6, 7, 7, 7, 8, 8) inches from the cast on edge.
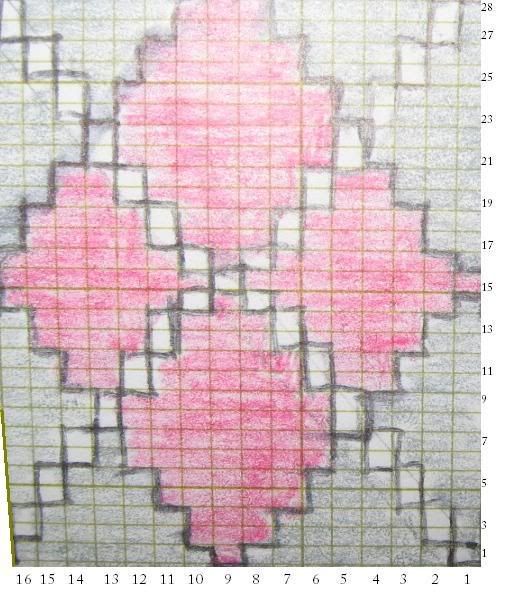
Stop working rib, and begin working the intarsia chart.
Begin at number 1 (1, 1, 10, 10, 14, 13) listed at bottom of intarsia chart. This will centre your argyle on the sweater.
Work the chart for 1 (1, 2, 2, 2, 2, 2) inches.
Increase row: You will be increasing 1 st each side every time you do an increase row.
(Work argyle pattern in to increases).
K1, increase 1, work across row until 2 sts before end, increase 1, knit last st.
*Work another 0.5 inches.
Work increase row.
Repeat from * 4 (1, 4, 8, 8, 8, 6) more times.
You should have 96 (102, 124, 144, 160, 184, 200) sts.
Now you will continue knitting the intarsia until piece measures 13 (13.5, 15.5, 15.5, 15.5, 16.5, 16.5) inches from the cast on edge.
Work across 27 (32, 42, 50, 56, 66, 74) sts, put middle 38 (38, 40, 44, 48, 52, 52) sts on a stitch holder, work across the remaining 27 (32, 42, 50, 56, 66, 74) sts.
Work 2 rows
Cast off for armholes: (please read ahead – you’ll be shaping the neck at the same time!)
Cast off 6 (6, 8, 8, 10, 12, 14) sts on each side of next 2 rows.
Decrease 1 st each side every RS row 4 (4, 6, 8, 8, 8, 8) times.
Neck Shaping: AT SAME TIME AS ARMHOLE SHAPING
Decrease 1 st each side of neck every RS row 12 times.
Work until arm holes measure 7 (7, 8.5, 9, 9.5, 10, 10.5) inches.
Put sts on holders.
Back
Work the back in the same manner as the front (excluding the intarsia chart) until neckline.
When piece measures 14.5 (14.5, 16.5, 16.5, 16.5, 17.5, 17.5) inches, put centre 38 (38, 40, 44, 48, 52, 52) sts on a stitch holder, and work the neckline the same as for the front.
Sew front and back together along sides, and graft/Kitchener stitch tops of front and back together.
Neckline
Using 2.25 mm circular needles, pick up stitches along neckline, including the ones you’ve placed on stitch holders.
Work in a 1x1 rib for 1.5 (1.5, 1.5, 1.5, 2, 2, 2) inches.
Cast off (be careful: don’t cast off loosely!)
Arms
Cast on 76 (76, 88, 96, 108, 116, 128) sts.
Work 1x1 rib for 1 (1, 1.5, 1.5, 2, 2, 2.5) inches.
Begin Sleeve Cap:
Cast off 8 (8, 9, 10, 12, 12, 14) sts at the beginning of next 2 rows.
Knit in rib for 4 rows.
Decrease 1 st each side every other row 5 (5, 7, 9, 10, 14, 15) times.
Decrease 1 st each side every 4th row 10 (10, 10, 10, 10, 10, 10) times.
When sleeve cap measures 5.5 (5.5, 6, 7, 7.5, 8, 8.5) inches, decrease 1 st each side every row 5 (5, 7, 7, 10, 8, 9) times.
When sleeve cap is 6 (6, 6.5, 7.5, 8.5, 9, 9.5) inches from cast on edge, decrease 2 sts each side every other row 5 (5, 5, 5, 5, 5, 6) times.
When sleeve cap is 7 (7, 8.5, 9, 9.5, 10, 10.5) inches long, cast off.
Finishing
Sew sleeves onto body.
Weave in all ends.
Blocking the finished garment is optional (the original, knit in angora, was not blocked).
Tips
Intarsia can easily become a hassle of tangled ends. In order to keep sane, I wound and then cut off a few feet of each colour-section. This certainly did add to the number of ends I had to weave in come finishing time, but was slightly more manageable than large balls of yarn emanating from my work.
Think twice before you use black! (If only to maintain decent eyesight). You can’t imagine how frustrating it is to try and neatly sew up black knitted garments with tiny gauges!
Intarsia Chart
Garment Schematic